 |
|
|
|
|
InPrint Article
Read this article, or see other newsletter articles. December, 2006 by Rand Huebsch
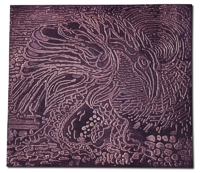
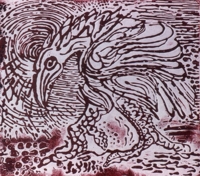
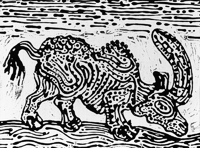
[Editor's Note: This is the most recent contribution by a New York-based artist to our newsletter. The wide variety of techniques Mr. Huebsch has described has received favorable responses from readers. A complementary technique by a Maryland printmaker will appear in a future issue.] Many people are familiar with the linoleum-block printing technique, in which areas of material are carved away, so that the uncarved areas will receive the printing ink. A similar printing effect can be achieved with the gessoprint, but that printing plate is made by adding material to a support, so is an additive process, rather than a reductive one. This allows for much directness and flexibility in plate making, and also makes it ideal for youngsters, as there is no need for them to use sharp implements like linocutters. Immediate and sculptural, gessoprinting uses materials that are easily available. In image planning, plate inking, and printing, the process resembles linocut and woodcut. Developing the Image The basic premise of the gessoprint is very simple: to make the durable printing plate, the artist applies acrylic gesso with a plastic squeeze bottle onto a Masonite or plywood support. Gessoprinting provides many options for fixing the image onto the plate. I often prefer the most spontaneous approach—"painting" directly with the squeeze bottle, without plate guide lines. (Sometimes an advance brush sketch on paper helps to formulate the basic image.) The gesso process is conducive to a pointillist build-up of aggregates of dot and line. When working without guide lines, it is very liberating to remember that a swipe of paper toweling quickly removes an unwanted gesso mark from the plate. You may prefer to use black gesso: it is commercially available, or you can mix black water-based ink or paint into white gesso. If you want to draw preparatory guide lines onto the plate itself, use charcoal; it has the advantage of easy erasure and revision. Another option is the transfer technique, which is, in fact, necessary when you are planning a multi-plate image. First, draw with pencil the basic outlines of your image onto a piece of tracing paper. (Include the outline of the Masonite plate to be used.) Apply soft charcoal to one side of the paper, enough to cover the lines you've drawn. In deciding which side to cover, remember that the image on the printing plate reverses on the print itself. Tape the tracing paper, charcoal side down, to the Masonite, using the drawn plate outline for registration. Trace the drawing lines with pencil: this will transfer the charcoal to the plate. For a multi-plate image, use the same tracing-paper image for the additional plates.
Making the Plate The manipulation of the squeeze bottle, which should be no more than three-quarters full, is a kind of painting technique. Three factors determine the thickness of the gesso line: (1) the speed with which the artist moves the bottle while squeezing; (2) the amount of pressure used; and (3) the distance between the bottle and the support that receives the gesso. For example, to make a line that decreases in width, move the bottle more quickly as you end the stroke. The gesso line is actually a coil of material; only the ridge will get inked when you prepare the plate for printing. Therefore, deposit a thicker coil of gesso than looks "right". Periodically, during the plate making, you will need to clear the aperture of the bottle to remove the drying gesso. When building up a large solid area of gesso on the plate, you can expect that, as it dries and settles, cracks or slight depressions will form. When you print, these "valleys" will pick up less ink than the surrounding areas. I think of these as happy accidents. However, to minimize cracking, periodically tap the drying gesso with a stiff-bristle brush or wire pot scrubber. This will be even more effective if the artist has used a mixture of gesso and modeling paste. You can also create large gesso areas by applying that same mixture to the plate with a brush. Do not allow gesso to dry in your implements. Once the plate is finished, allow two to three days for the gesso to dry thoroughly—more if there are large solid areas. You can then modify it; many artists like to proof the plate before making any changes. To make broader printing surfaces, which will pick up more ink, plane the gesso with medium-grade sandpaper. To refine the edges and end points of lines, carve with linocutters (not for use by very young students). Use cutters also to incise lines into large areas of gesso—if your image involves overprinting of colors, this will allow the underlying color to show through in whatever shapes have been carved. You can, of course, add more gesso to the support and onto dried gesso. Apply an acrylic sealant to the dried plate. Printing the Plate For printing, either the etching press or the hand method is an option: each has its advantages. Apply the ink to the plate with a brayer. I prefer oil-based ink, as it has a longer drying time. If using water-based inks, you may want to add acrylic retarder, as that can slow the drying time and make printing easier. As with any relief process, you can choose to print a multi-plate image "wet on wet" or can allow the first impression to dry before printing the second plate. Hand-printing has the advantage of control. Thin Asian papers work best for printing by hand and they allow you to see how much ink is being transferred as you burnish the plate. Use a Japanese baren (printing disk) or wooden spoon for printing; by angling the implement, you can transfer ink from lower levels of the plate. If you are to burnish on a paper that tears easily, first place a thin sheet of acetate over it, to serve as a protective barrier. Experiment also with selective burnishing and with varying the printing pressure in different areas of the plate. If you wish to print on heavy-weight printing papers, a press is helpful. On a letterpress, the plate would need to be type-high, whereas that is not needed if an etching press is used. An etching press can also be used to do embossings from the plate, which is very sculptural. While you can emboss on a wide range of papers, Canson mi-teinte pastel papers are especially effective, as they change color slightly on the raised areas of the embossing. (This paper should be lightly dampened, then blotted, before you print.) For emboss printing, more pressure is needed than for relief printing. When embossing, always use a sheet of foam rubber between the plate and the etching blankets, to avoid damaging the blankets. Remember that the plate's raised (gessoed) areas will create the recessed areas on the embossed paper. To help conceive your images, study bas-relief sculptures and their use of space. I have also embossed onto black Rives paper and then lightly rubbed it with Caran d'Ache crayons: the lower areas remain black, and the resulting image evokes the luminosity of stained glass. To plan a plate for this use, draw with crayons or pastels on black paper. A small gesso plate can also be used as a matrix for making tiles or plaques, when pressed into clay slabs. Gesso plates can themselves be used as sculptural pieces. Try adding acrylic colors to the gesso before it is deposited on the plate, or you can hand-color the dried gesso, as you would an embossed paper print. Experiment with incising into dried gesso. Materials: Sources and Safety Most of the materials used for gesso printing are easily available at art supply stores. The plastic squeeze bottles can be catsup or mustard dispensers or the containers used to apply hair dye—almost any container with a conical cap is suitable. Masonite and plywood for the support are available at lumber stores. Gesso printing is a very safe process, but there are a few considerations. Any acrylic product should be used in a well-ventilated room, as some fumes are created. If you are very sensitive to dust, consider wearing a dust mask when sanding the dry gesso. Similarly, if you are allergic to oil-based ink, wear latex gloves when printing. I find that vegetable oil works well for cleaning oil-based inks from inking slabs and printing plates; remove the residue with soap and water. While the gessoprint shares many aspects of traditional relief techniques, the additive nature of the plate making provides, literally, another dimension for the printmaker. In developing ideas for your prints, consider a wide range of expressive work. Picasso's linocuts display the exuberant lines that gesso printing so easily provides. The woodcuts of the German Expressionists can also serve as sources of ideas. And the bas-relief carvings of many ancient civilizations can offer much inspiration for your imagery. Photos by Daniel Falgerho. |
Site hosting and maintenance courtesy of


